In my experience, there is no such thing as luck.
Welcome back to the third part of our ongoing Star Wars: X-Wing guide! If you’re just joining us, be sure to check out part 1 (an explanation of the game) and part 2 (playing your first game).
We’re gearing up to play our next game and this time, we’ll be adding in a number of advanced rules. This is still not the “full” Star Wars: X-Wing experience, as we’ll only be using the Core Set for a small game. Additionally, we won’t be using upgrade cards just yet.
In our first game, we played X-Wing in its most approachable format. The simple game variant focuses only on ship maneuvers and rolling dice.
Now, we’re stepping it up to what we consider a medium complexity version. We’ll be adding a few new rules that make X-Wing a more tactical game for young players that have mastered ship movement and combat. Before diving into a full game, give this modified gameplay a try.
This game will focus on adding colored maneuvers, critical damage, the Action Phase, and Obstacles.
In order to play this modified scenario, you’ll need these items from the Core Set:
In our last game, the flow looked like this:
In this game, we’re adding the Action step of the Activation phase:

As you can see on the Blue Squadron Escort card above, there are three possible actions noted by icons. From top to bottom these are:
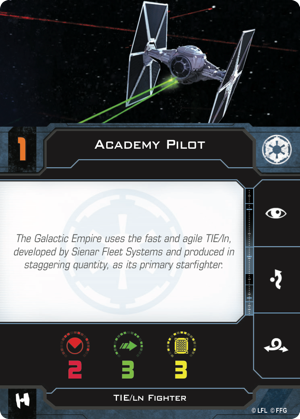
The Academy Pilot and Black Squadron Ace can perform a different set of actions:
Play starts as it did in your first game:
Once your ship has moved, you can choose one of the three actions depicted on your ship card…
Focusing is a powerful action. If you choose it, place a round, green focus token next to your ship.
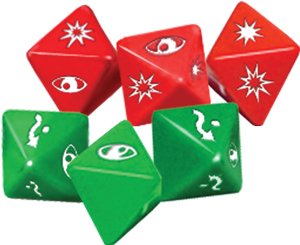
Both the red attack dice and green defense dice feature an eyeball icon on two of their eight sides. After rolling dice, you may spend your focus token to change every focus icon showing on the dice to either a regular (filled in) hit when attacking or an evade icon when defending.

In order to Lock on, an enemy ship must be at range 1 to 3. When choosing this action, assign the square lock token matching your ship’s ID number token to the enemy ship. You can only lock onto one ship at a time. When attacking the locked ship, you can spend the token to re-roll any and all of your attack dice.

Evading is a smart choice when you know you won’t be able to attack during a round and want to ensure you can cancel at least one hit. When choosing this action, place a round, green evade token next to your ship. While defending, you can spend the token to change any die result (including a blank) to an evade symbol.

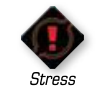
You may have noticed that X-Wing Second Edition tokens come in a few different shapes. Round tokens, like evade and focus, clear at the end of the round, even if they haven’t been spent. Square tokens, like lock and stress, are persistent until they are cleared by a game effect.
A barrel roll is a short bonus maneuver that can be used to get out of an enemy’s firing arc or ensure than an enemy lands inside your own. In order to barrel roll, place the straight “1” maneuver template aligned with the side of your ship (instead of the front or rear guides). Pick up your ship and place it on the other end of the template facing in the same direction.
For this game, pay attention to the maneuvers that are printed in red and blue on the dial. Red maneuvers will “stress” your pilot. These are often useful for getting out of danger or swooping in for the kill. They’re so powerful though, that the rules prevent you from overusing them.
After executing one of these maneuvers, place a square stress token (featuring an exclamation point) next to the ship. Stressed ships may not take actions (like focusing or evading), nor can they execute red maneuvers on subsequent turns. In order to clear a stress token, choose a blue maneuver on the dial on one of your next turns.
Don’t be afraid to experiment with stressful maneuvers, especially the Koiogran turn and Tallon roll (refer to the quick-start guide for ship placement instructions). These are especially useful for quickly changing your ship’s orientation and getting an enemy in your firing arc.
Once the activation phase has completed and eligible ships have taken their actions (remember, you won’t be able to take an action if your ship is stressed), it’s time to attack! We covered attacking and defending in the second part of the guide, but now we’re going to introduce critical hits.
Here’s how the engagement phase works for a game using this rule set:
The red attack dice feature four icons:
Once all the dice have been rolled and modified, each evade symbol cancels hits starting with regular hits. In a scenario in which the attacker has a result of one regular hit and one critical hit and the defender has a result of one evade symbol, the final result is one critical hit.
When an attacker scores a regular hit, the defending ship is dealt one face down damage card. For a critical hit, the damage card is placed face up. There are 14 different critical hit effects that can affect how many dice you roll, inflict additional damage, stress your pilot, and more.
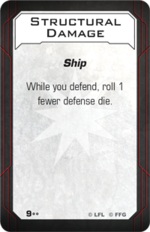
Since critical hits often have ongoing effects, place a token next to your ship to remind you that there are additional modifiers in play.
There are some upgrade cards that let you repair damage, but we’ll cover that in the next installment. Critical hits, especially Hull Damage, can cripple your ship in a fight. Remember, shields block both regular and critical hits.
The last addition for this game are the three asteroid tokens and the three debris field tokens. As you might expect, it’s bad news if you run into one of these. Asteroids and debris fields have slightly different penalties.
If you collide with an asteroid, either by ending your movement on it or passing through it, roll one attack die. If you roll a regular hit, suffer one damage (or lose one shield). If you roll a critical hit, suffer one face up damage card (or lose one shield). The ship loses its action for the turn regardless and, if the ship is still overlapping the asteroid, it cannot attack. OUCH!
Debris fields are a bit more forgiving. If you pass through one, roll an attack die. On a critical hit, suffer a face up damage card (or lose one shield). Regardless of the roll, your ship gains a stress token (which means it can’t perform an action this turn, also).
Obstacles have one more impact on the battle. If the range ruler passes through an obstacle (measured between the two closest points on the attacker and defender plastic bases), the defender gets to roll an additional die.
And that’s it. You have everything you need to run a medium-complexity game of Star Wars: X-Wing.
In our next installment, we’ll still be sticking with the Core Set components. However, we’ll be adding the quick-build cards that come with the Core Set, upgrades, and custom obstacle placement.