Here's where to find all 12 Lucky Emblems in the world of Hercules.
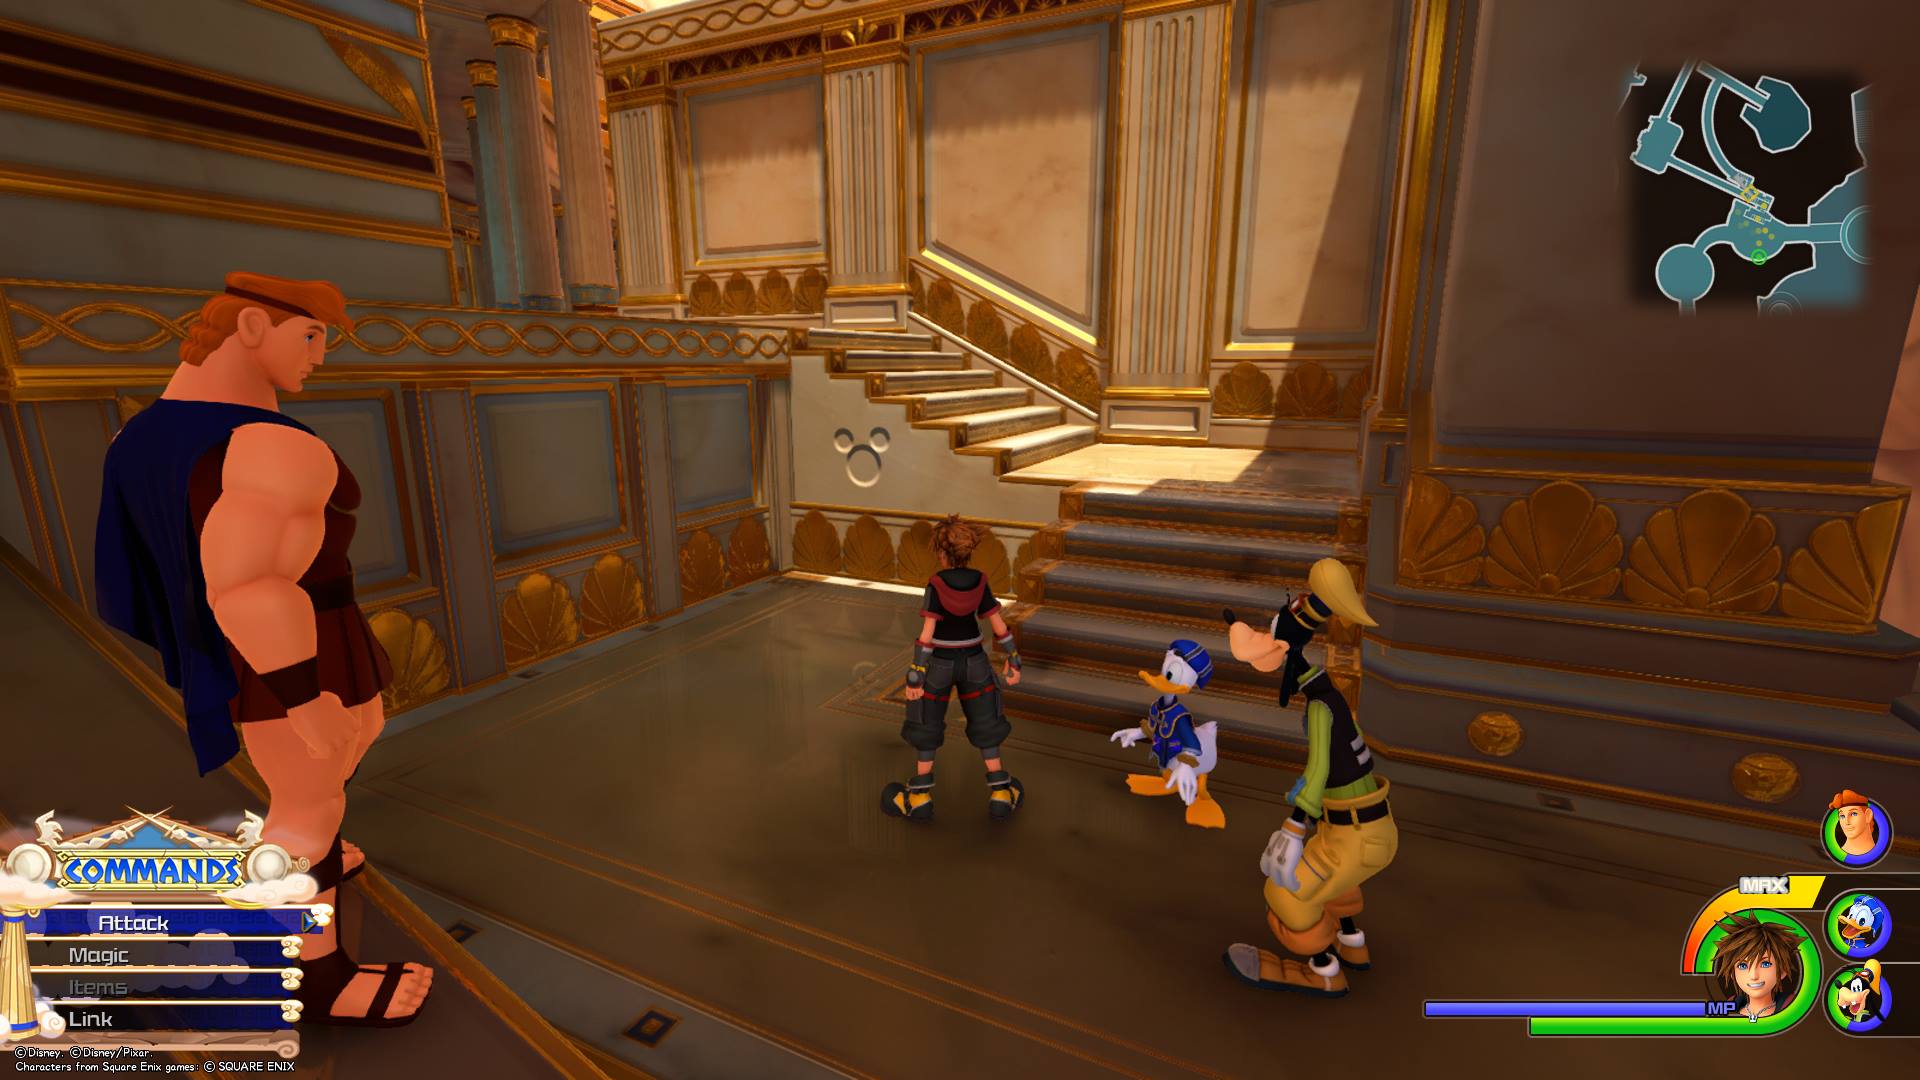
One of the first worlds you’ll visit in Kingdom Hearts 3 is Olympus, home to Hercules, Meg, and the evil Hades. There are 12 Lucky Emblems (hidden Mickeys) to photograph in Olympus, but you won’t be able to take pictures of them the first time you visit this world. Instead, you’ll need to make a return trip after you’ve unlocked Sora’s gummiphone.
The video below will show you where to find all 12 Lucky Emblems in Olympus. If you’d prefer, keep reading to see a picture and text description related to finding each one. For reference, our guide starts by landing at the Agora save point from the World Map. It’s also worth keeping in mind that Olympus’ layout can be pretty confusing, so if you need extra help, make sure to look at the image for each Lucky Emblem to see the exact location on the in-game map, or refer to our video guide.
Olympus Lucky Emblem No. 1
From the Agora save point, run to the back of the area and look for a stairway between two buildings. The Lucky Emblem is imprinted on the stairs.
Olympus Lucky Emblem No. 2
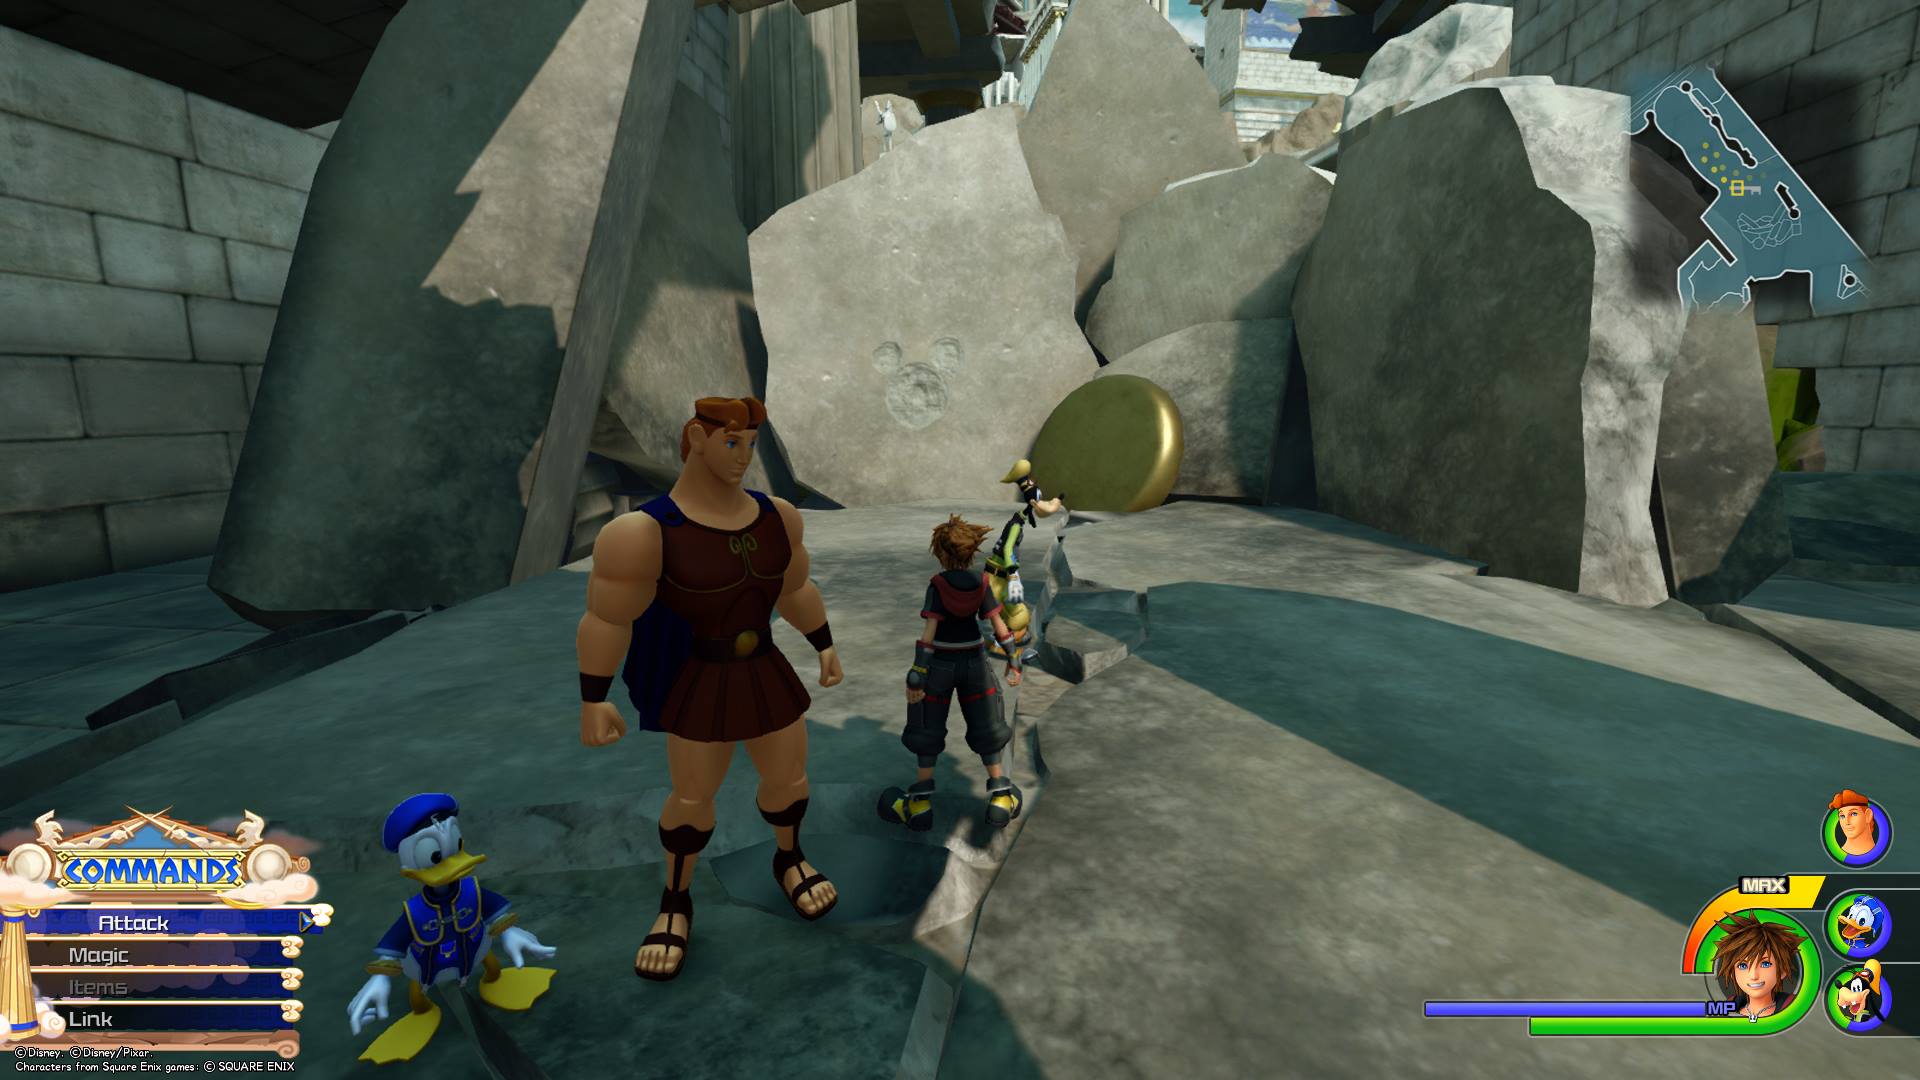
From the first Lucky Emblem, turn left and run toward the Gardens area of Thebes. Make your way into the ruined building that was on fire the first time you visited Olympus. (If you watch out for the location information that appears on the left side of the screen as you make your way into each new area, this one is located in the area called “The Big Olive”.) In the middle of the ruins, you’ll find the Lucky Emblem on a stone wall next to a large golden disc.
Olympus Lucky Emblem No. 3

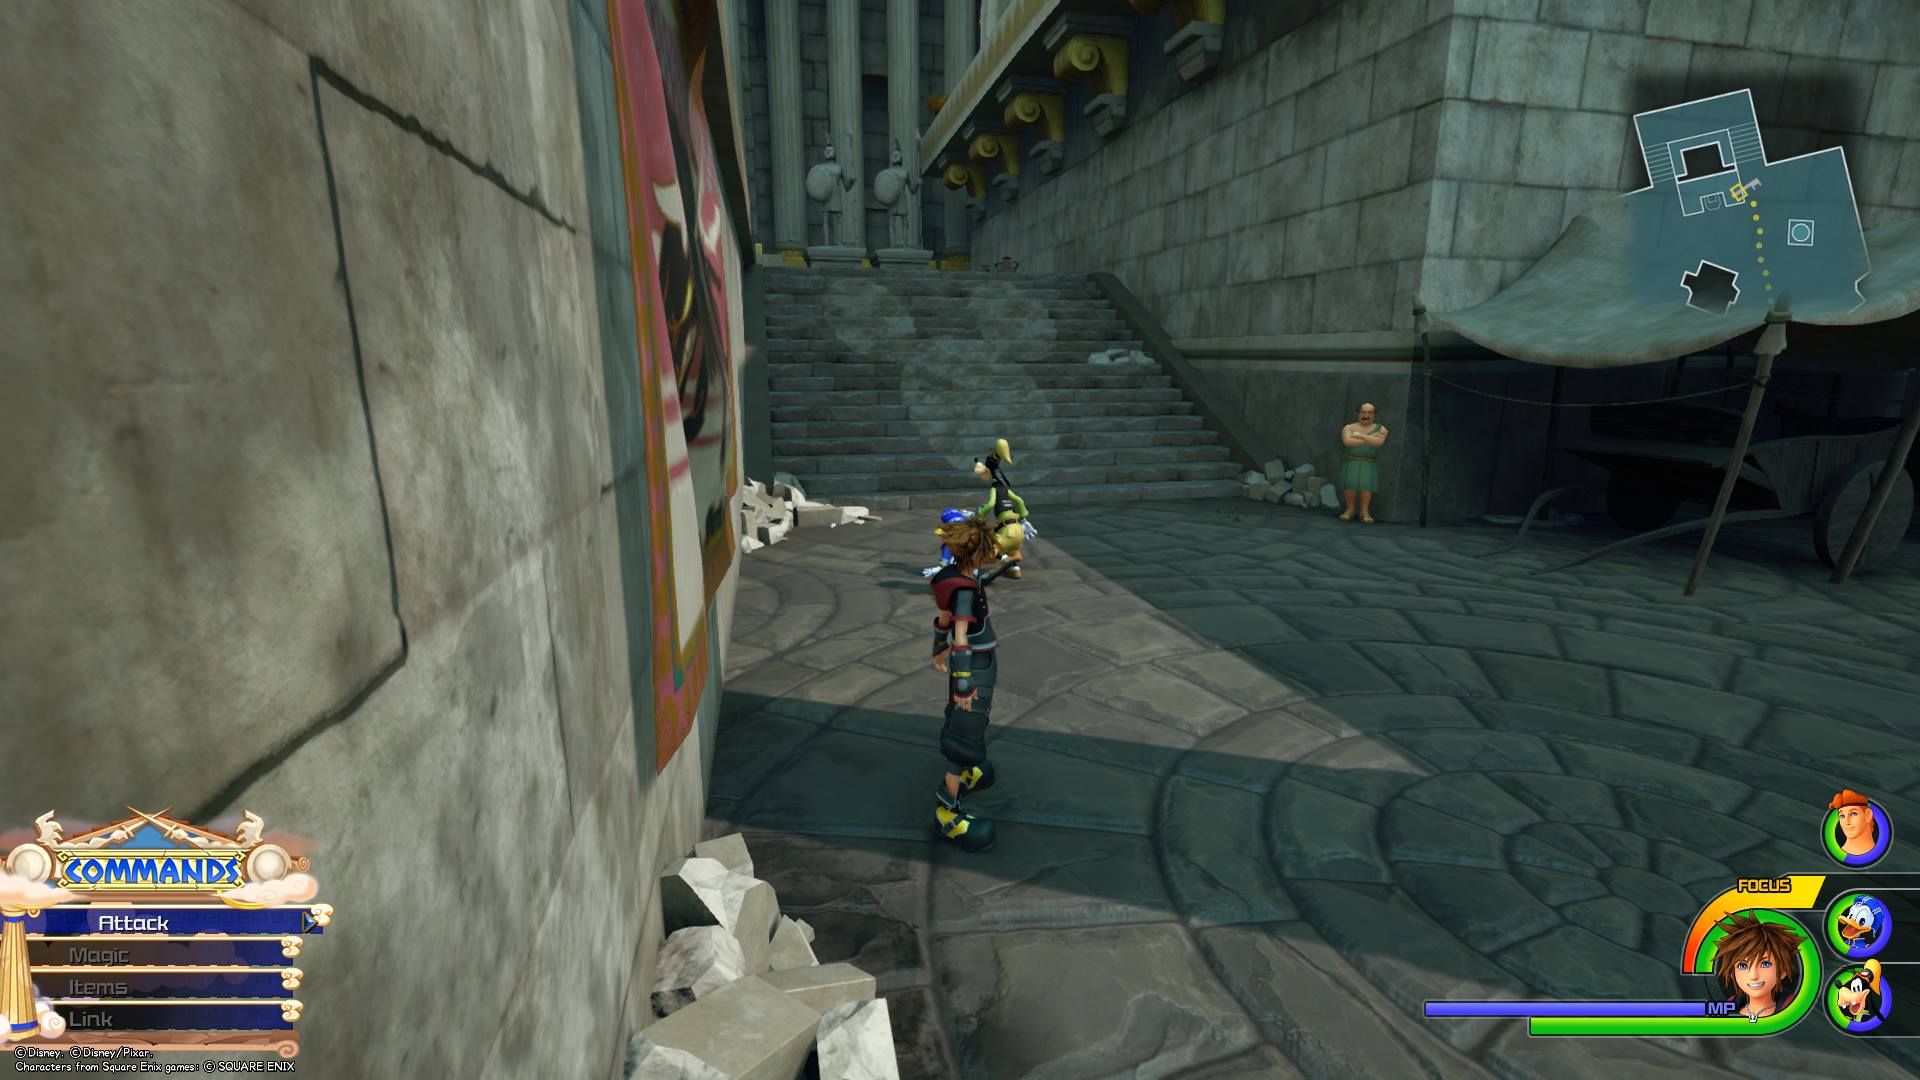
There’s quite a trek between the second Lucky Emblem and the third. You can either run all of the way through the Gardens area until you eventually reach the “Overlook” area, or you can head back to a save point and warp to the Overlook save point. Either way, once you make your way into the Overlook area, look for a staircase with columns and a tapestry hanging on the wall nearby. The Lucky Emblem is embedded in the wall next to the staircase.
Olympus Lucky Emblem No. 4
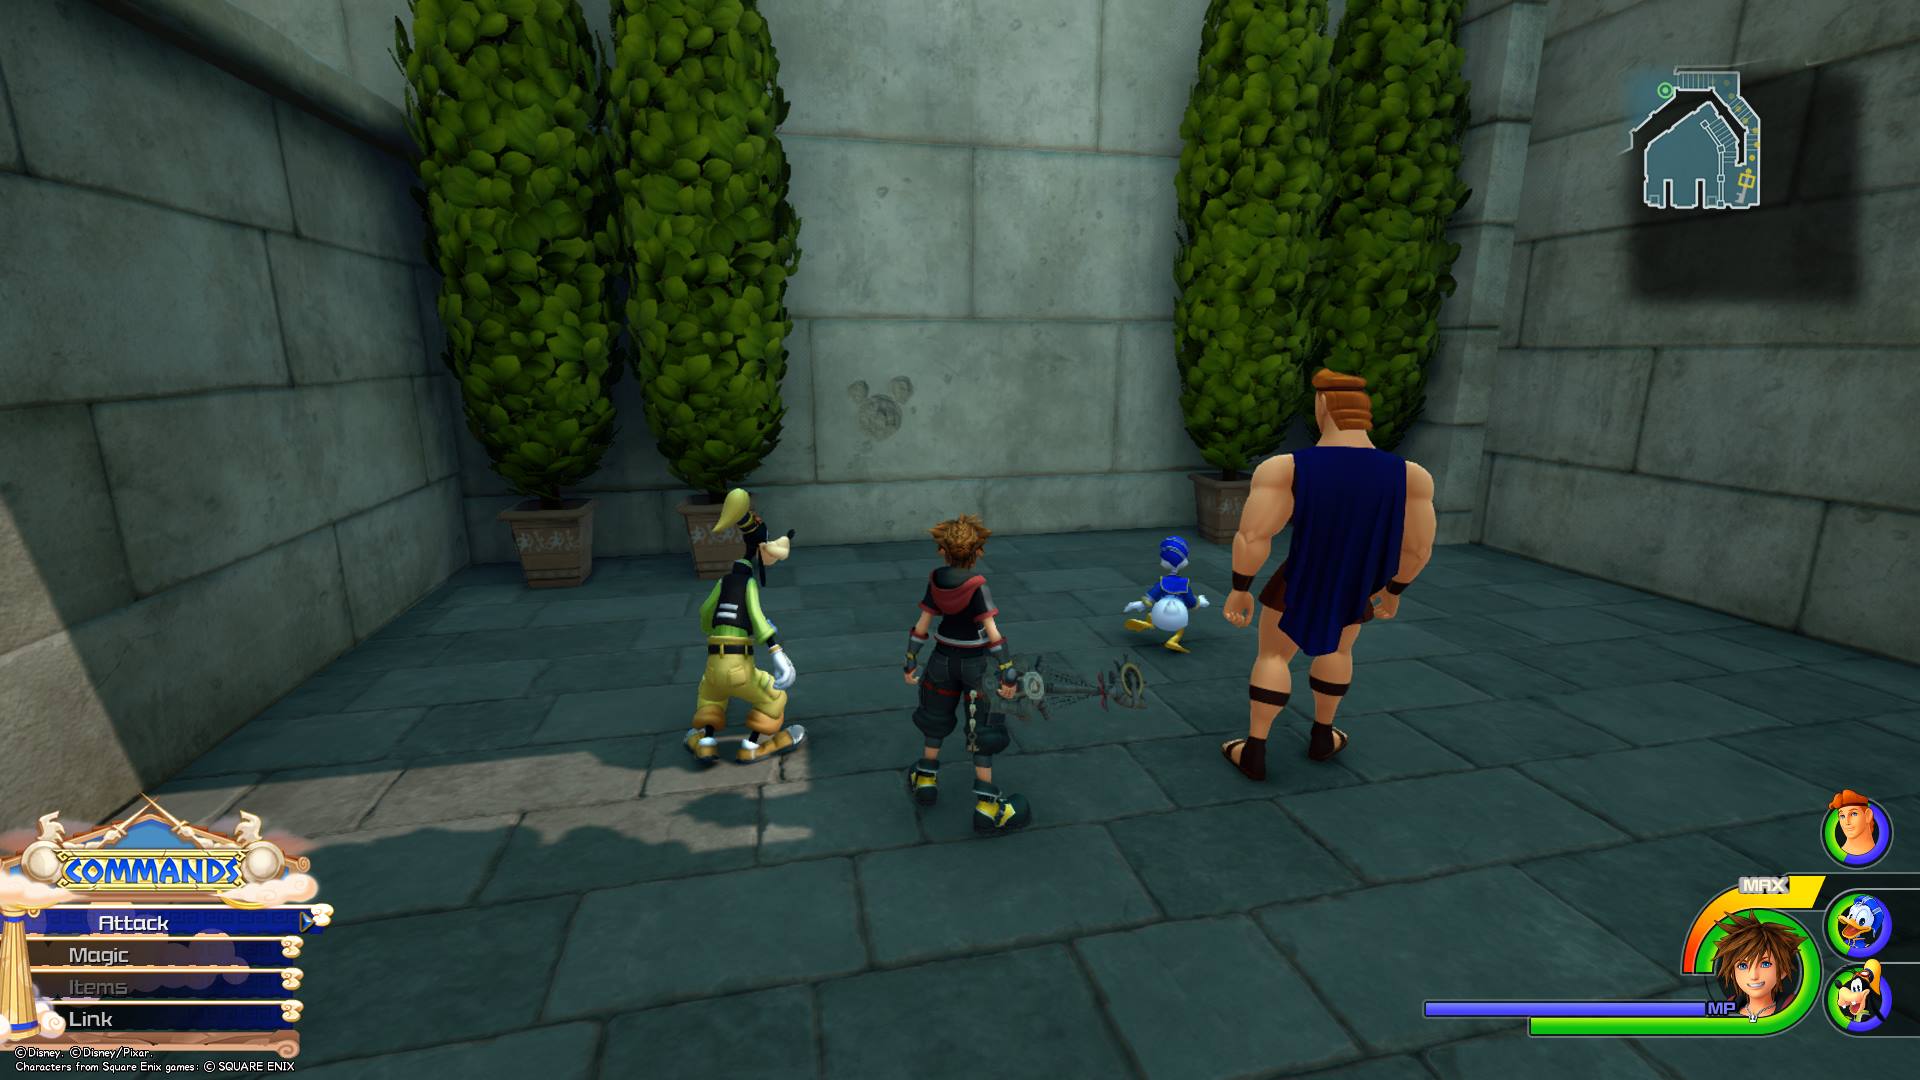
From the third Lucky Emblem, run up the stairs and keep going until you reach a dead end. Turn left and run up the large wall. Make your way across the rooftops and past the ruins until you reach a courtyard with a narrow staircase that leads to the platform with the Overlook save point. Once you climb this first staircase, make a U-turn and climb another narrow staircase. You’ll find the Lucky Emblem on the wall in between four potted plants.
Olympus Lucky Emblem No. 5
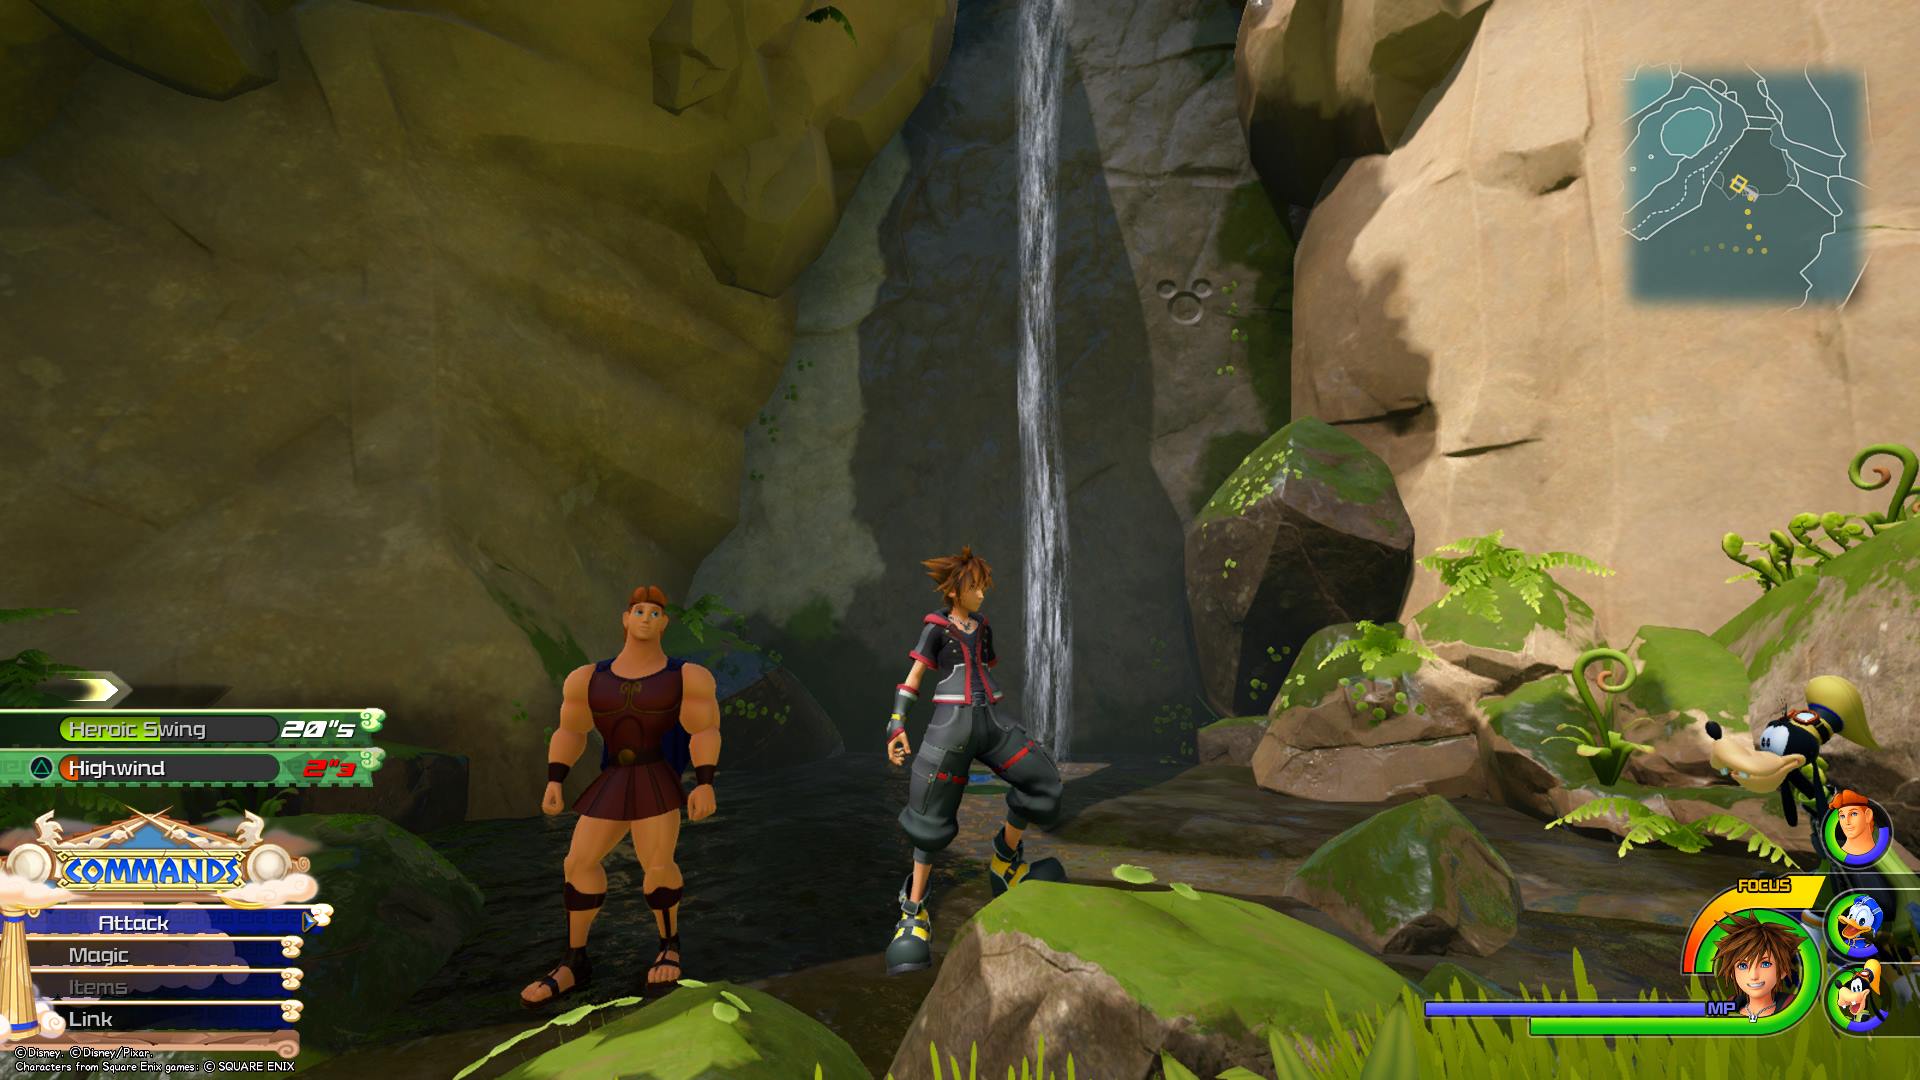
After finding the fifth Lucky Emblem, we recommend using the Overlook save point to warp back to Agora. From there, turn around and leave the area so you enter the “Mount Olympus” portion of the world (the outdoor area with streams and cliffs). Make your way through this first area until you climb a cliff face and the location marker tells you you’re in the “Cliff Ascent” area. Climb a few more rocks and make your way down a fairly narrow pathway until you reach a rock with a trickling waterfall at the end of the path. The Lucky Emblem is on the cliff face by the waterfall.
Olympus Lucky Emblem No. 6

From Lucky Emblem No. 5, turn around, run back down the path and then continue climbing the mountain toward the dark portion of the Cliff Ascent area. Once you climb a few cliff faces, you’ll run through a large archway. Once you run through the archway, turn around, and the Lucky Emblem is on one of the archway’s columns.
Olympus Lucky Emblem No. 7
Once you’ve photographed the sixth Lucky Emblem, keep climbing the mountain. When you reach a clearing on the edge of a cliff with a cave entrance to your left, walk to the edge of the cliff and look down. You’ll see the Lucky Emblem on top of a rock formation below you.
Olympus Lucky Emblem No. 8

After photographing Lucky Emblem No. 7, make your way through the nearby cave and keep running until the game tells you you’re in the “Mountainside” area of Olympus. When you reach the end of the path, climb the large walls to Sora’s left until the sky turns dark. You’re now in the dark portion of the Cliff Ascent area, which we referenced earlier. Make your way through this area until you reach a clearing with a dead tree (when you reach this clearing, it should start to rain). The Lucky Emblem is formed by some vines hanging from the tree.
Olympus Lucky Emblem No. 9
The next Lucky Emblem is in the Realm of the Gods. If you’re following our guide, the easiest way to reach this area from Lucky Emblem No. 8 is to simply keep climbing the mountain until you make it past the “Summit” area and to the entrance of the Realm of the Gods. You can also reach the Realm of the Gods by warping to one of the three save points in this area. From the entrance to the Realm of the Gods, make your way across the large courtyard and continue up the path until you reach the area labeled “Corridors.” When you reach this area, climb the small set of stairs to the right, which will take you into a hallway with an L-shaped staircase. The ninth Lucky Emblem is on the side of the stairs.
Olympus Lucky Emblem No. 10

After photographing Lucky Emblem No. 9, climb the L-shaped staircase and continue forward until you reach a staggered waterfall. Fall off of the edge of the waterfall, and you’ll find yourself in the “Secluded Forge” area. The 10th Lucky Emblem is on the side of the anvil in the center of the forge.
Olympus Lucky Emblem No. 11
Once you’ve taken a picture of the Lucky Emblem in the Secluded Forge, make your way back into the Corridors (there’s a rail you can use at the other end of the Forge to make your way back up). After you land back in the Corridors, turn around and head into the building. You’ll eventually enter a large room where Heartless spawn. In this room, look for two pots in an alcove along the wall. Break the pots and you’ll find the Lucky Emblem on the wall behind one of the pots.
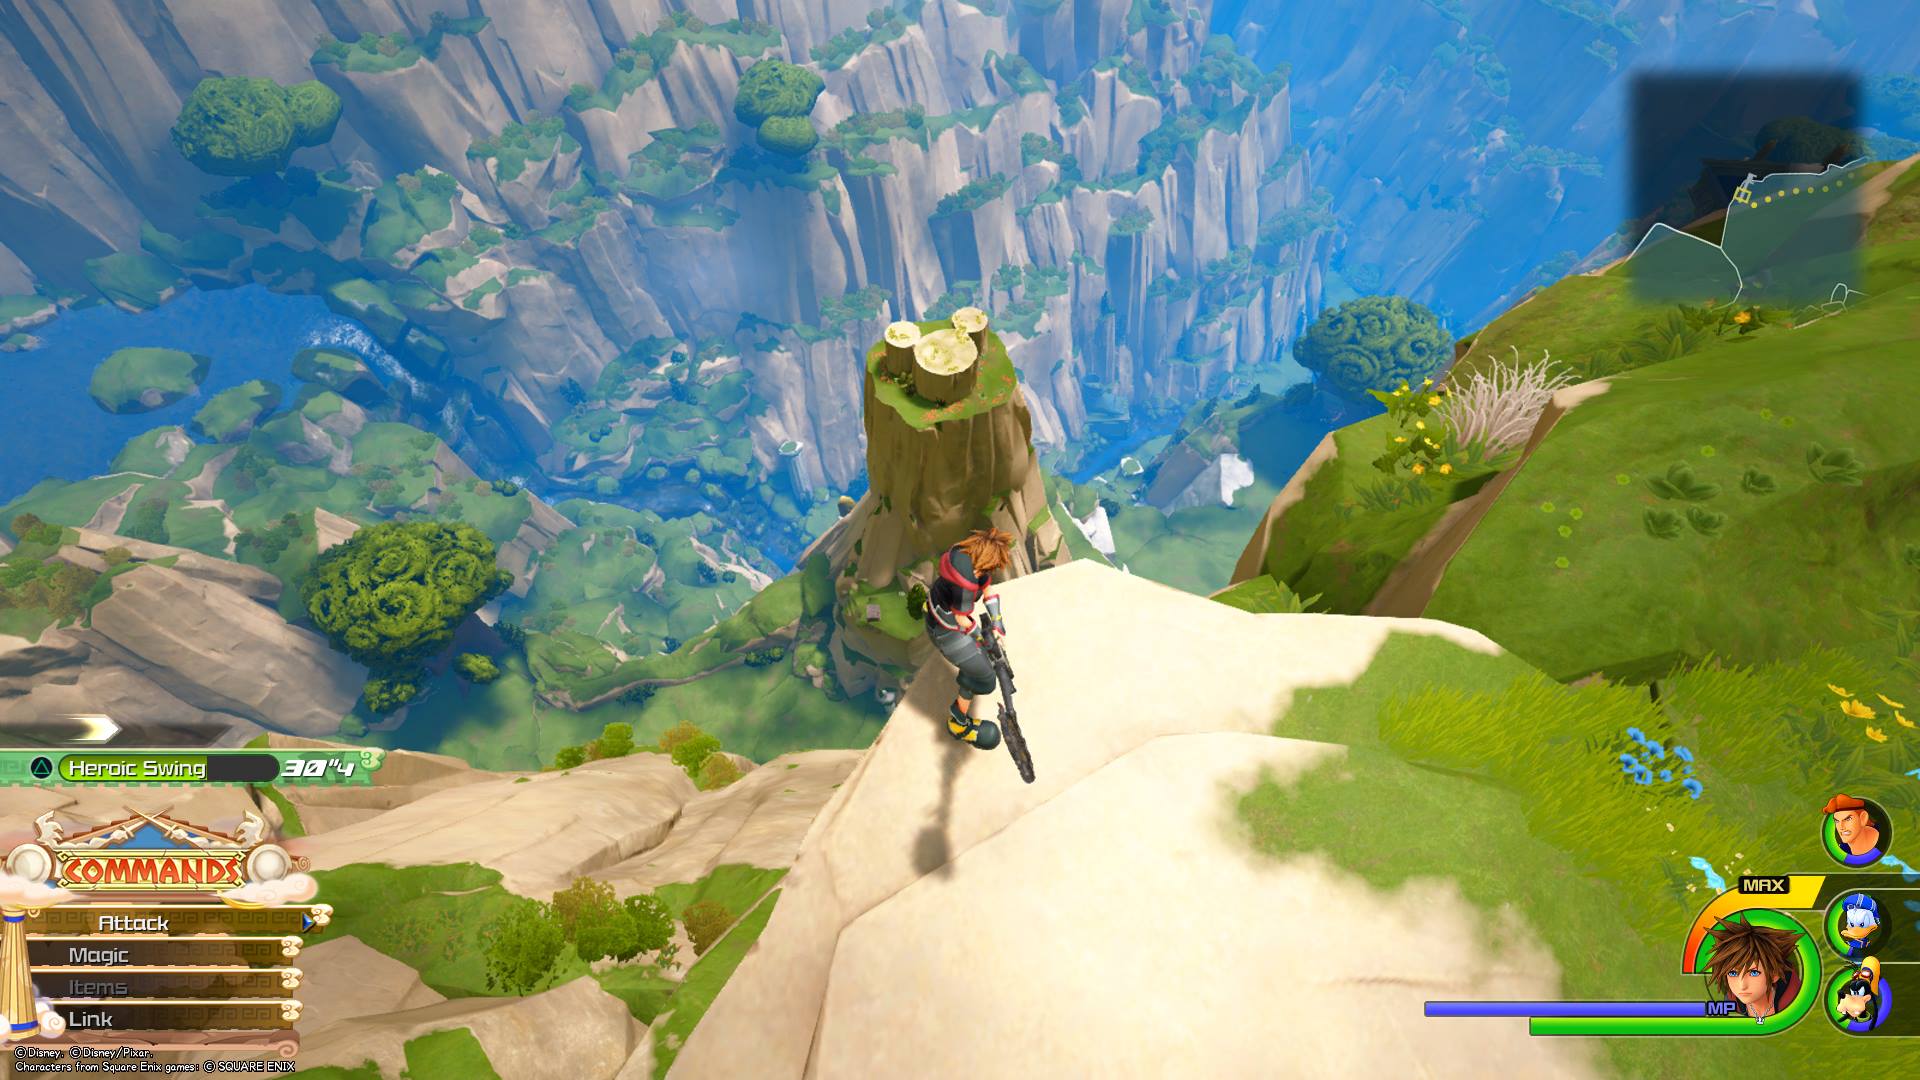
Olympus Lucky Emblem No. 12

From Lucky Emblem No. 11, backtrack out of the Corridors area until you reach the Corridors save spot. From there, run up the ramp and use the rail at the top. You’ll land in the “Cloud Ridge” area. Climb the stairs and look for the final Lucky Emblem off in the distance. It’s formed by three clouds.
Looking for more Lucky Emblems in Kingdom Hearts 3? Check out our other guides:
Kingdom Hearts 3: Twilight Town Lucky Emblem Locations
Kingdom Hearts 3: Toy Box Lucky Emblem Locations
Kingdom Hearts 3: Kingdom of Corona Lucky Emblem Locations